Andalucia Steve

...living the dream

Setup and Intonation of a P.R.S SE Single Cut

Working around an awkward bridge

P.R.S SE Single Cut - Setup

Body shot of a Paul Reed Smith SE Single CutThis was the first time I'd been given a PRS to work on so I was looking forward to the job. What a beautiful instrument. Fairly heavy body (Mahogany I'm told) with contouring that made it feel very comfortable to hold, and a great sound when I plugged it in - I can see why people become converts to these things!

The brief from the client was that it had not been out of it's case for a year so it needed to TLC - a setup with particular regard to the intonation was the order of the day.

A setup establishes the playability of the guitar, essentially by making sure the distance between the strings and the fret-board is consistent for the whole neck and that it matches the gauge of strings used and the preference of the player. In this case, I know the client has quite large hands and he does not like the 'action' - the distance between the neck and the strings to be too low. He likes to get under the strings when bending. So the first thing was to make sure the action suited him.

I took some measurements and the action didn't need any adjusting at all. There was just the right amount of bend in the neck so the truss rod didn't need adjusting. The nut was fine too, so were any further adjustment needed it would only be necessary to adjust the bridge height. This guitar has an all in one bridge with a height adjustment screw at each end - it would only be necessary to raise or lower these to alter the action. As it turned out, even this was not required. I think they setup these guitars pretty well at the factory!

..and now intonation

Closeup of the PRS wrap-around bridgeDespite not needing any setup adjustments, the intonation was way off. A lot of guitar players get baffled by intonation, but it's really not that hard to understand. Guitar necks are built to a specific scale length, so the frets are distanced according to that dimension. However different gauges of string, temperature variations and differences in setup (whether a high or low action is used) mean the actual length of the string might be very slightly incorrect. Most guitars have a way of adjusting this by moving saddles on the bridge that can lengthen or short each string very slightly.

Well this bridge was a little more tricky than most. You can probably see in the picture, there are saddles on the bridge for each string, but in order to move them, there are grub-screws that fit a small Allen key. But the angle at which they are set means the string is in the way - I couldn't get the Allen key in without de-tuning the string by an octave, so any hopes I had of adjusting the strings under tension was impossible. Probably not a bad thing as it minimizes any risk of damaging the saddles but it meant the job took a half an hour longer than I budgeted for!


Anyway, in case you are not familiar with the method of fixing the intonation on a guitar, it's really easy. Set your guitar tuner to chromatic mode. Then tune up as normal. Now try each string in turn but fretting the notes at the twelfth fret. all being well, as you would expect, the notes should be an octave higher. If they are sharp or flat you have an intonation problem. If the note at the twelfth is sharp, you need to extend the effective length of the string by moving the bridge saddle back, or forward if the note is flat. In this case that meant de-tuning each string by an octave to get access to loosen the grub screw, move the saddle, re-tighten and check with the tuner. All in all it took about half an hour to do all six strings.


Is Intonation worth it?

Given it is such a seemingly small, fiddly adjustment, is adjusting the intonation worth it? Well, if you try it you'll surely hear the difference. I find that the CAGED chords will sound more in tune with each other when the intonation is 100% correct. It's as though the guitar is suddenly in tune with itself. Even if you're a heavy metal player grundging out five chords all night, you'll probably notice a crisper less muddy distortion coming from your amp.

I noticed this most of all when I replaced the traditional three saddle bridge on my thirty year old Telecaster with a bridge with six independent saddles. After intonation it was like a new guitar - as if it was the first time I was able to tune it properly since I bought it. Whenever I see Telecasters with three saddles now I think the owner is really missing a trick!

Strat Scratchplate

Fitting a custom scratchplate to a genuine Japanese Strat.

The client had a spec - to change the plain white scratch-plate on his Fender Stratocaster to something a bit more exotic. We emailed, we talked and after trawling several websites, he sent me a link to the scratch-plate of his dreams. The one he chose was a mother of pearl effect that cost about thirty dollars. I immediately went to some Chinese websites and found the same scratch-plate for about three dollars. Had to wait a couple of weeks for it to arrive in the mail but the client was happy as I passed the saving onto him.

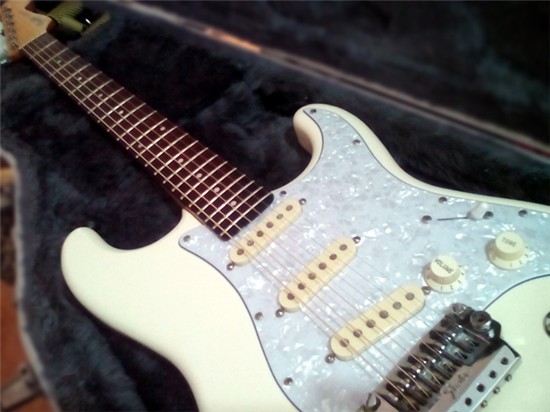
Out of the box the new scratch plate looked fine, though when I actually came to fit it, there was a problem near the bridge. The new scratch plate had a cutaway section for the old style tremolo whereas this guitar has a Fender floating trem which is bigger and has the two bridge posts right where the new scratch-plate needed to go. Since I'm starting to get more and more of this sort of of work I decided to document each step and record the time for each, so I know how much to charge. Here is how the job went....

Step One (15mins) - Removed existing scratch plate and unscrewed all the hardware. First surprise - the pickups were non standard. The new pickups were the Bare Knuckle Rory Gallagher Irish Tour set.

Step Two (5 mins) - The tremolo block was a bit grubby so I sprayed a ton of WD40 on it and left it to soak for a while.

Step Three (10 mins) - The fret-board was a but grubby too so I cleaned it with lemon oil.

Step Four (5 mins) - Polished the guitar body which was especially dirty where the scratch plate had been.

Step Five (40 mins) - Compared the scratch-plates and found them not quite the same, so marked out a new shape around the tremolo and routed by hand with a Dremel on its lowest setting so as not to melt the plastic. This was the trickiest bit of the project so I took my time to get it absolutely right.

Step Six (10 mins) - Attached the hardware to the new scratch plate

Step Seven (10 mins) - Attached scratch plate to the guitar body. Found two holes were misaligned so had to drill pilots for two new ones.

Step Eight (90 mins) - Replaced strings. Setup for new strings. These were a much heavier set and I needed to dig out a fifth spring to attach to the tremolo block to handle the increased tension, and adjustment was also required to the intonation.

It's always tempting to think of something like changing a scratch-plate as a trivial five minute job, but as this miniature 'time and motion study' shows, this job took a shade over three hours.